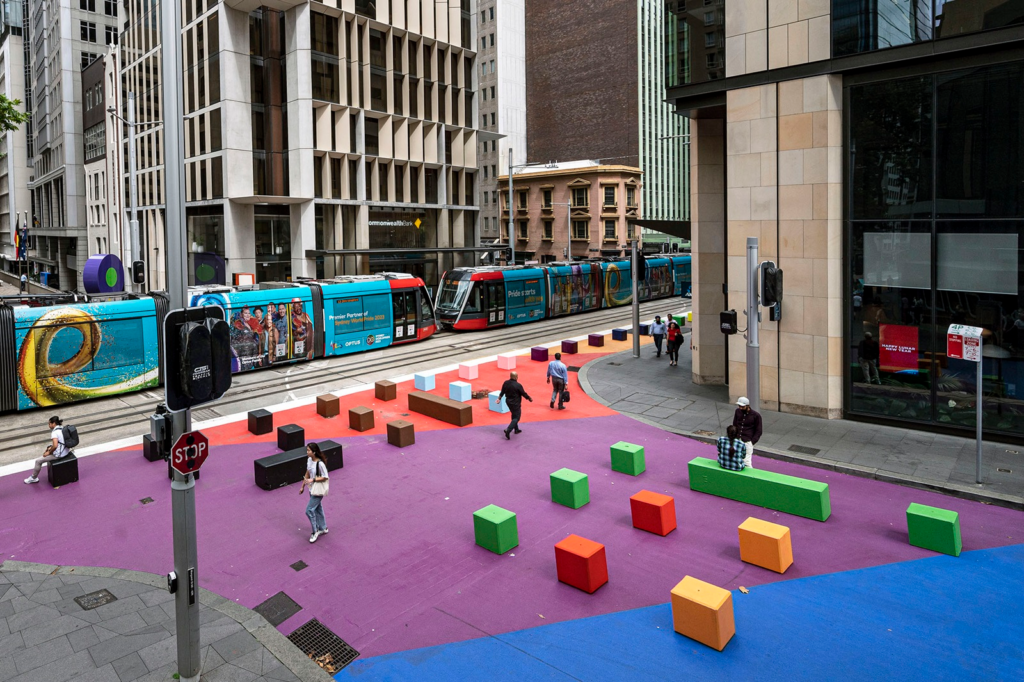
This technical guide details how you can create your own aerial imagery (aka satellite view/bird mode/orthorectified imagery) and 3D models of streets with the built in iPhone LiDAR sensor (iPhone Pro 12 or later, 2020+ iPad Pro) and open source tools in the OpenDroneMap package. All you need to do to capture the model is walk around with your iPhone at ground level.
Why is this useful?
Usually for such a task you would use a drone and process with WebODM (or Pix4D), but there are areas that are unsafe or illegal to fly in. I’ve previously detailed how to generate imagery using a bicycle helmet mounted GoPro camera, however this can include artifacts where there are lots of people. The helmet camera method requires a decent GPS lock (unsuitable indoors, urban areas or under a bridge) and has relatively low detail.
Again, why might you want to do this? With your own high detail and up-to-date models and street imagery you could:
- Map new street interventions, like bollards, modal filters or raised crossings
- Record pothole locations (and their depth!)
- Take measurements such as road and cycleway widths around crowds of people in urban centres
- Measure footpath obstructions in 3D and rate pedestrian amenity
- Survey features underneath large highways
- Survey street parking using the new OSM spec: wiki.openstreetmap.org/wiki/Street_parking
- Map indoor pedestrian areas in OpenStreetMap for better pedestrian routing
- The Transport for NSW Connected Journeys Data team is currently doing a fair bit of this work: https://www.openstreetmap.org/changeset/133107592
- Attach your iPhone to your bike and generate LiDAR point clouds of the kerb and cycleway infrastructure (it works, just go slow!)
This method results in very high detail (5mm resolution if desired) 3D models and accurate orthoimagery. Manual georeferencing is required (which I also explain how to do) which limits the confidence in alignment. This is a proof of concept – if you have corrections/suggestions/ideas to improve the method, please comment below or on Mastodon!
Note: This method also provides a solution to creating 2.5D oblique orthophotos from drone imagery.
Process overview
This guide covers how to:
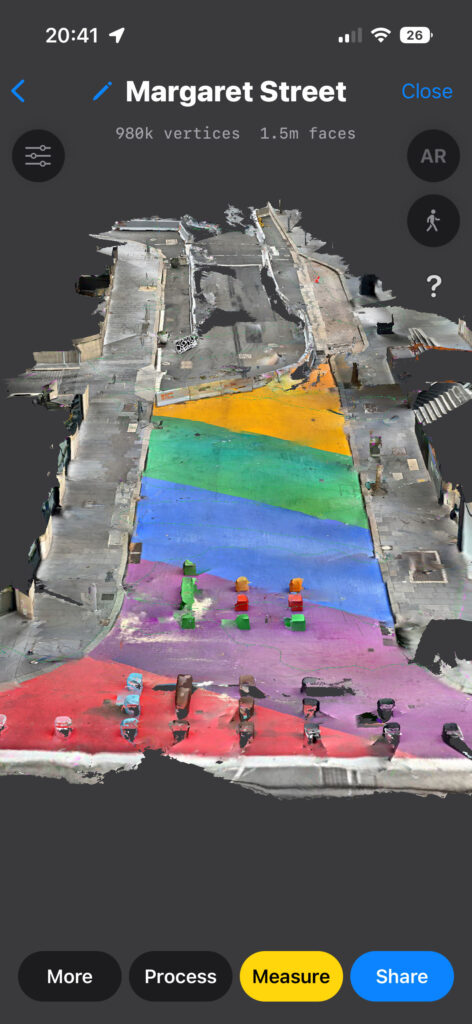
- Capture a 3D model using 3d Scanner App (recommended) or Polycam
- The iPhone LiDAR sensor has 5 metres max range, so you’ll need to walk around
- Export the model to an
.objfile with textures - Rotating the model in Blender to the required orientation
- Use the
odm_orthophotoprogram inside the OpenDroneMap Docker container to generate a raster.tiff - Georeference the tiff using QGIS
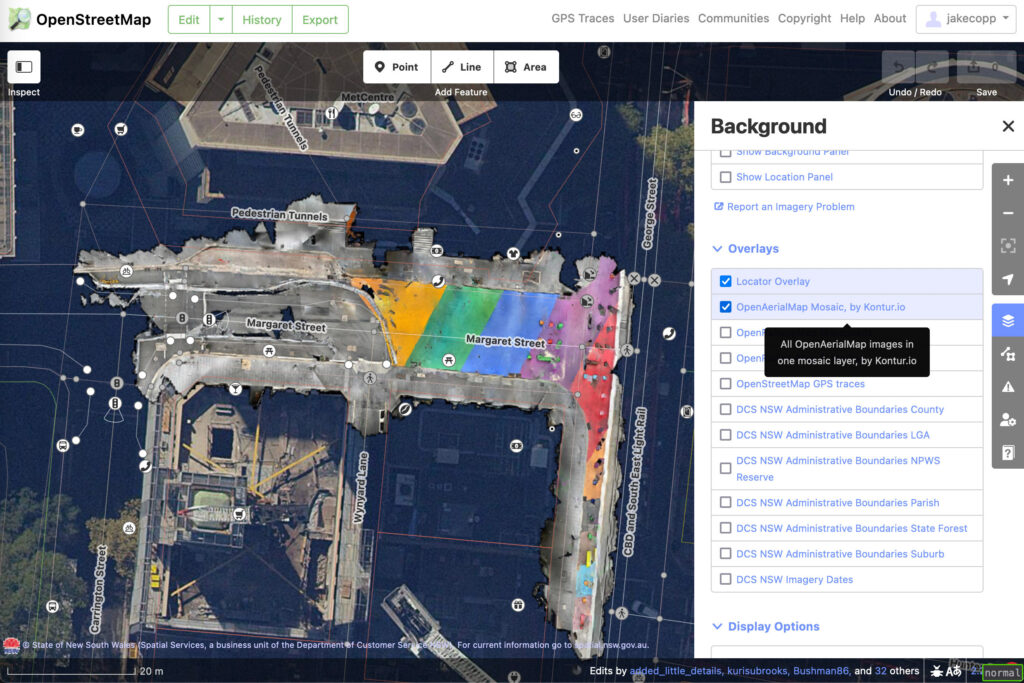
- Uploading the Geotiff to OpenAerialMap to generate a tileset, viewable in the OpenStreetMap iD editor or a Felt map with a custom layer
Capturing the model
Capturing a 3D model on an supported iPhone is easy. I recommend using the app titled 3d Scanner App as it allows considerable customisation of the scan settings. It allows finishing a scan and extending later, though this can be buggy. I haven’t had a crash during capture – I’ve had Polycam crash halfway through a large scan losing all data.
Download 3d Scanner App and use the LiDAR Advanced mode. I recommend the following options for scanning streets:
- Confidence to low. This extends the range of the LiDAR sensor readings used at the expense of more noise. You can clean up this noise in the processing settings or Blender.
- Range to 5.0 metres
- Masking to None
- Resolution to 50mm (the lowest – for large models like streets)
In the app settings, make sure to set:
- GPS tag scans to ON
- Units to metric
When scanning a street, walk (or cycle) slowly with a sweeping motion to increase the width. If the area is wide enough to require a grid pattern, follow the same shape as a drone survey (an S-shape with considerable overlap). Not enough overlap or higher speeds mean the linear passes don’t connect correctly due to (I assume) inertial measurement unit drift. I’m unsure if the GPS information is used in the sensor fusion (via ARKit), please comment if you know!
Exporting and preparing the model
In the 3d Scanner App use the Share button, then select the .obj file type. Send this to your computer (Airdrop works great if using macOS). If using Polycam, set “Z axis up” in the mesh export settings.
Rotating the model into the correct orientation (required for 3d Scanner App)
Unfortunately the 3d Scanner App exports objects with the Z axis as “up”, while the odm_orthophoto program expects the Y axis to be “up”. Confusingly, you can skip this step if using Polycam if exporting with “Z axis up” in the mesh export settings, though Blender shows the Y axis as up in this export. If you know why this is, please leave a comment!
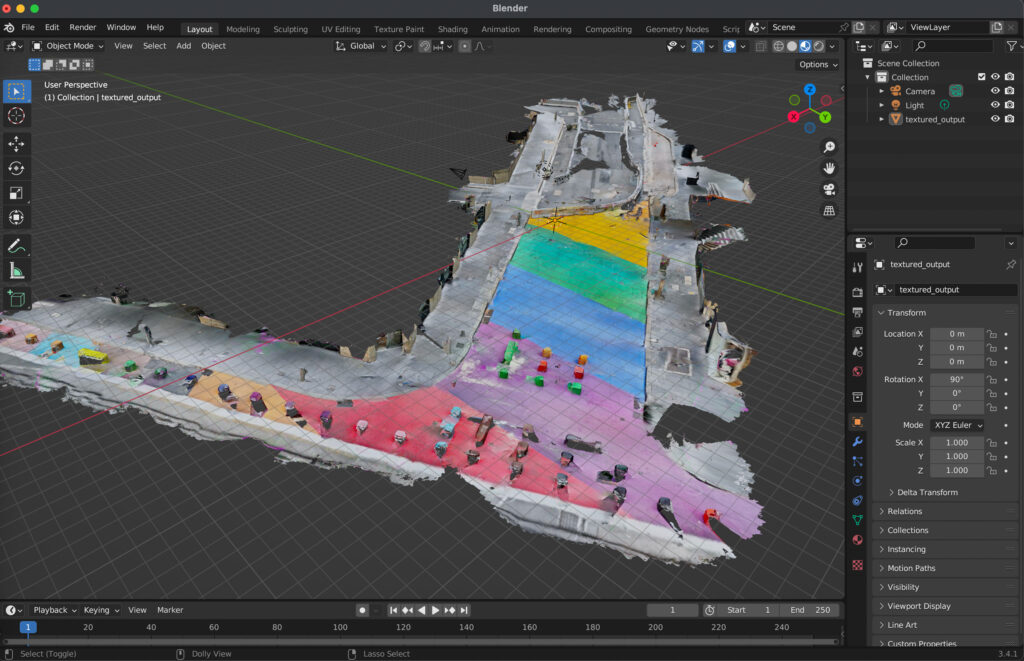
To rotate the model, import it to Blender and rotate it 90 degrees.
- First, install Blender via your preferred method (https://www.blender.org/download/).
- Open Blender, delete the initial default cube (right click -> delete, or
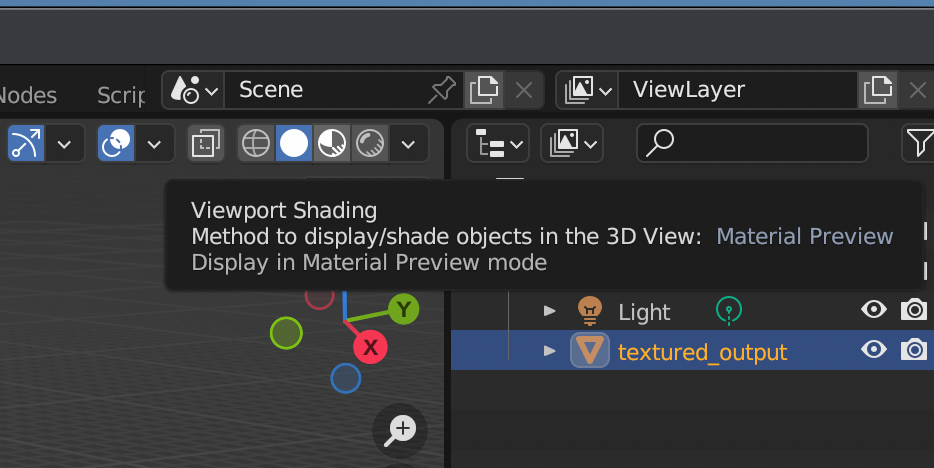
xhotkey) - Import the
.objfile: File -> Import -> Wavefront (.obj) - (optional: you can view the pretty texture by selecting “viewport shading” in the top right (the horizontal list of sphere icons))
- To rotate
- Click the object and make sure it is selected (orange border)
- Press hotkey
r(from any view) - Press
xto only allow rotation on X axis - Type
90(or desired degrees to rotate)
- Optional: You can check if the rotation is correct by pressing numpad key 1. If you don’t have a numpad you will need to enable numpad emulation (see instructions at https://www.hack-computer.com/post/how-to-emulate-a-third-mouse-button-and-keypad-for-blender).
- The rotation is correct if you have a “birds eye view” in the numpad key 1 view, where the blue Z axis is towards the top of screen and the red X axis is towards the right of screen

odm_orthophoto. Not the axis display at the top right.- File -> Export as an
.objto the same folder with a new name (eg.blender_export.obj)- Note: Blender doesn’t create a new texture
.jpg. If you export to a different folder the path to the.jpgin the.mtlfile will need updating.
- Note: Blender doesn’t create a new texture
Generating the raster orthophoto
Use the odm_orthophoto command line tool to generate a raster orthophoto from a .obj file. This tool is available at https://github.com/OpenDroneMap/odm_orthophoto but has a considerable number of dependencies.
I believe the easiest method currently is to install WebODM locally, copy the .obj and texture files (.mtl and .jpg) into the Docker container and then run the program from inside the Docker container.
Installing WebODM locally
Running the software using Docker is a breeze. Install Docker from https://www.docker.com/ (or your preferred method) and then:
git clone https://github.com/OpenDroneMap/WebODM --config core.autocrlf=input --depth 1
cd WebODM
./webodm.sh start
See https://github.com/OpenDroneMap/WebODM#getting-started for more details. WebODM itself is excellent and great fun if you have a drone!
Copying the object into the ODM Docker container
You can start a shell in the container with the following command:
docker exec -it webodm_node-odm_1 /bin/bashMake a new directory to keep your files in
mkdir /iphone_model
cd /iphone_model
In another shell, copy the object and texture files from your local machine into the new Docker container folder. docker cp can only copy one file at a time.
cd path/to/your/model/
docker cp blender_export.obj webodm_node-odm_1:/iphone_model/
docker cp blender_export.mtl webodm_node-odm_1:/iphone_model/
# Note: The blender .obj export doesn't create a new texture .jpg
#   If your Blender export wasn't in the same directory, check
#   update the path in blender_export.mtl
docker cp textured_output.jpg webodm_node-odm_1:/iphone_model/
Running odm_orthophoto
In the shell you started in the docker container above, run the following command:
cd /iphone_model/
/code/SuperBuild/install/bin/odm_orthophoto -inputFiles blender_export.obj -logFile log.txt -outputFile orthophoto.tif -resolution 100.0 -outputCornerFile corners.txt
The resolution argument is how many pixels per metre – this may require changing.
Exporting the orthophoto out of the Docker container
To copy the generated orthophoto out, from a shell on your local machine run:
docker cp webodm_node-odm_1:/iphone_model/orthophoto.tif .Use a similar command to extract the log file if required.
Georeferencing the orthophoto
Georeferencing is the process of specifying the location and orientation of the image so it perfectly aligns with maps or GIS software. While a rough location (with a moderately incorrect rotation) is stored in the model, it appears to be removed by the Blender rotation step. If you know how to fix this please comment below!
To do this:
- Install QGIS by your preferred method: https://www.qgis.org/en/site/forusers/download.html
- Install the plugins (via the Plugins -> Manage & Install plugins… menu)
- QuickMapServices (to pull in Bing satellite imagery easily)
- Freehand raster georeferencer (a beginner friendly georeferencing tool)
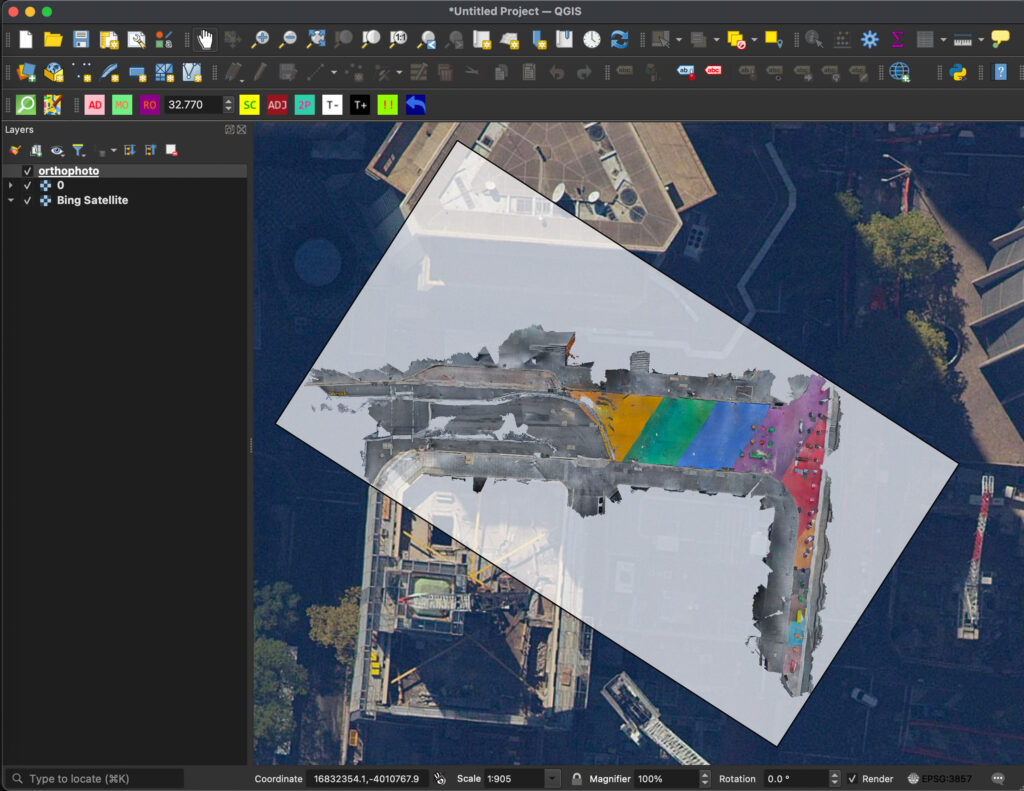
- Add a Bing satellite base layer: Web -> QuickMapServices -> Bing -> Bing Satellite
- Feel free to choose another satellite background of your chosing
- If you’re in NSW: the NSW LPI Imagery is likely the most detailed, follow: https://www.spatial.nsw.gov.au/products_and_services/web_services/qgis
- Zoom & pan to the rough location of the 3d scan (the initial
.tiflocation will be wherever you’re viewing) - Drag the
.tifoutput by the previous step into the sidebar (it won’t be visible yet as it is not aligned) - Go to Raster-> Freehand raster georeferencer -> Add raster for freehand georeferencing and select the same
.tif - Use the Move, Rotate and scale buttons in the toolbar to align your orthophoto with the imagery background (tip. Hold Cmd or Ctrl before scaling to keep the aspect ratio)
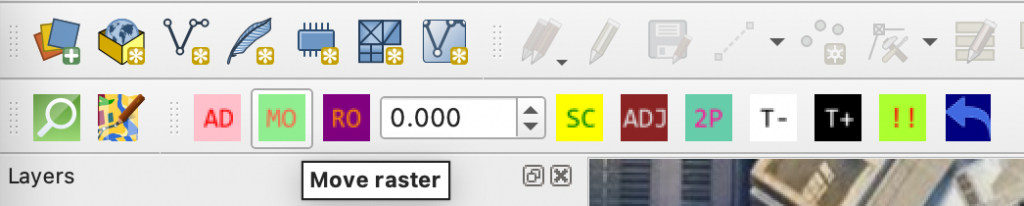
- Click the “Export raster with world file” button (Green on the right with exclamation marks).
- Check the “Only export world file for chosen raster” button. Make sure to do this before chosing the image path.
- Select the existing
.tifimage and press OK - Remove the orthophoto from the QGIS sidebar (right click -> remove layer)
- Drag the existing
.tifimage back into the sidebar. QGIS will now find the worldfiles next to it (orthophoto.tif.aux.xmlandorthophoto.tfw) so it will be positioned in the right place
Export geo-referenced GeoTIFF (without worldfile)
If you would like to upload the GeoTIFF to OpenAerialMap or somewhere else, you will need to “bake in” the location into the GeoTIFF itself, rather than in the worldfile – OpenAerialMap can’t read the worldfile.
To do this:
- right click your
orthophotolayer (after the above steps) and click Export -> Save As… - Set
CRSto your desired coordinate system (if not yet in a coordinate system, I assume you should useEPSG 3857if you want it to be aligned with OpenStreetMap tiles, but this is the limit of my current understanding – I haven’t studied surveying yet!). - To avoid confusion, create a new subfolder and save it with the default settings (eg. make folder
qgis_exportand save as orthophoto.tif). - You now have a nice georeferenced GeoTIFF!
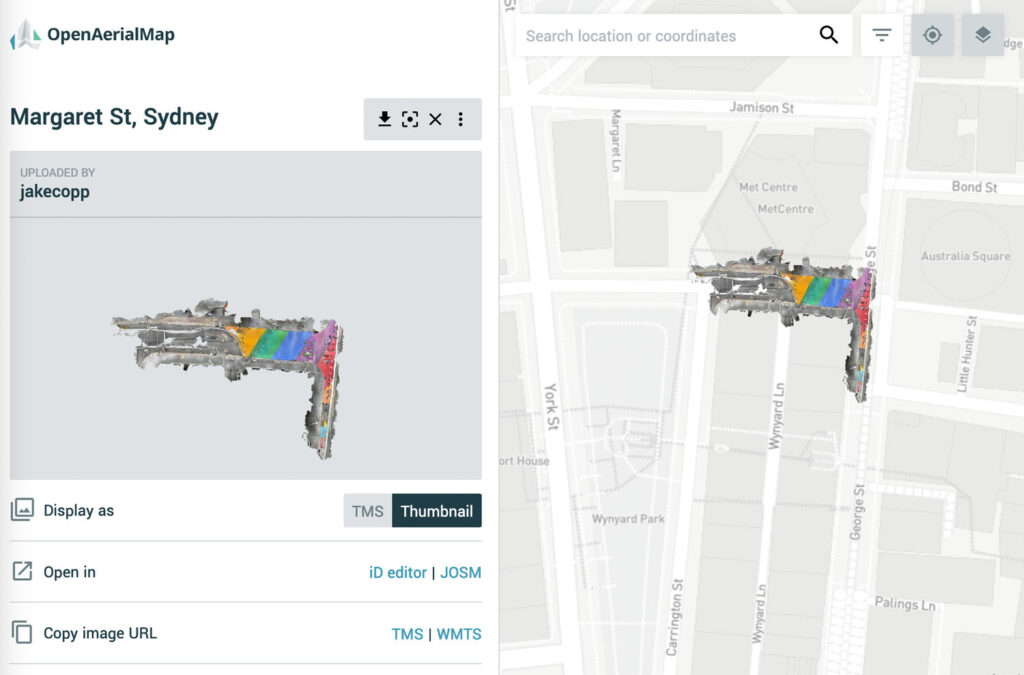
Uploading to OpenAerialMap
If you want the imagery to be publicly viewable and accessible from the OpenStreetMap iD editor, OpenAerialMap is a free place to host your imagery.
This is the imagery from the above example: https://map.openaerialmap.org/#/-18.6328125,18.562947442888312,3/latest/
I’ve heard of plans for a relaunch of the website, but currently the upload form can be finicky.
- Open the explore page: https://map.openaerialmap.org/
- Sign in (only Google & FB Oauth supported)
- Press upload
- Currently uploading from local file doesn’t appear to work, see https://github.com/hotosm/OpenAerialMap/issues/158 for updates
- Uploading via Google Drive with my account (2fa enabled, Gsuite) fails with This app is blocked: This app tried to access sensitive info in your Google Account. To keep your account safe, Google blocked this access.
- Enabling less secure apps is not possible for 2fa accounts. Otherwise, if you’re comfortable turning it off you can do that here: https://myaccount.google.com/lesssecureapps
- Using a URL is likely the only way. Creating an S3 bucket is one way. If you have a fast connection it would be faster to run a local webserver with Python and running ngrok to make it publicly available. I recommend not keeping this server running for longer than necessary. Eg:
cd qgis_export
python3 -m http.server 8080
ngrok http 8080
# Your file is now available at https://SOME_PATH.ngrok.io/orthophoto.tif
Specify this url in the form and add other details, then press upload.
Limitations
- Manual alignment limits the real world accuracy of imagery
- Drift during long model captures occurs. My understanding is drift occurs more when there are sudden or fast movements. The 3d Scanner App unfortunately doesn’t warn you when you’re moving to fast, but Polycam does. As far as I know, the iOS ARKit doesn’t attempt to reconcile drift when completing a loop/circuit.
Future work
- Automation! This process is slow but it works.
- Adding a Makefile or other compile tooling to https://github.com/OpenDroneMap/odm_orthophoto would skip the requirement to install WebODM and transfer files to/from the Docker container
- Rotating the model could be added (behind a flag to be backwards compatible) to the odm_orthophoto script
- Generating pointclouds (supported by 3d Scanner App) and then exporting as a raster from CloudCompare. This might make larger captures possible.
- If there is a way of addressing drift of pointclouds for multiple captures – let me know how!
- Georeferencing using ground control points rather than a freehand referencer
- Creating street facade montages and evaluating doors & soft edges (Jan Gehl (1986) “Soft edges” in residential streets, Scandinavian Housing and Planning Research,3:2,89-102, DOI: 10.1080/02815738608730092)
Let me know if you have any corrections/suggestions/feedback!
Leave a Reply