See comments on Hacker News (24 comments, 220 points)
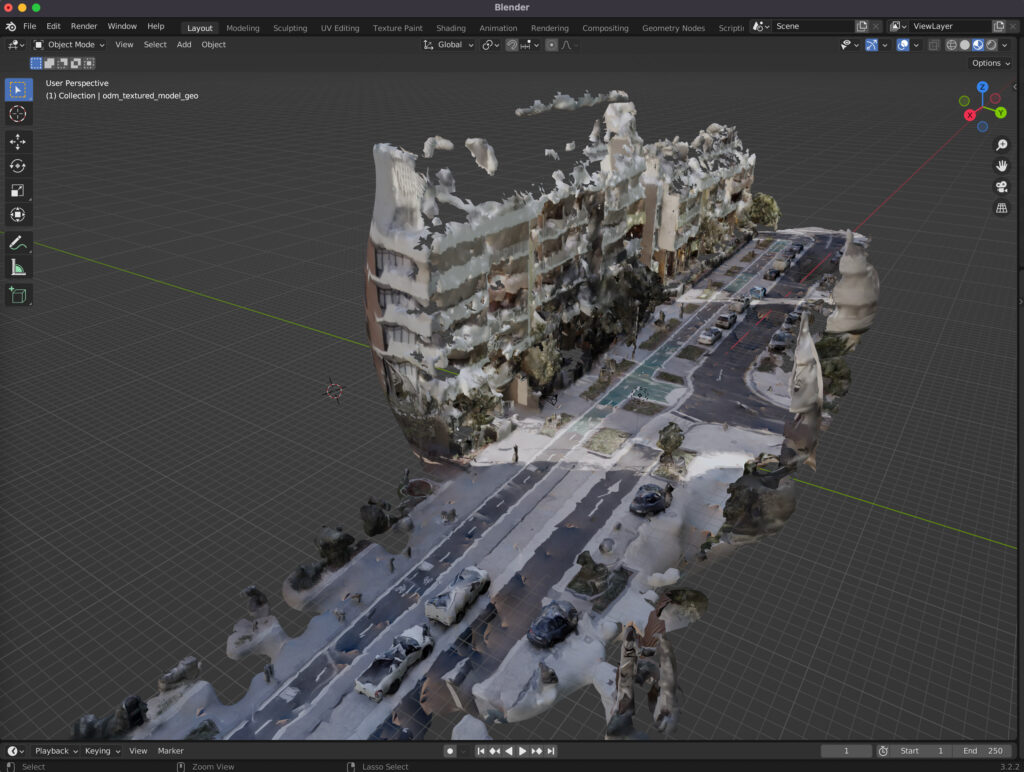
This technical guide details how you can create your own orthorectified (aka satellite view/bird mode) imagery, point clouds and 3D models of streets with nothing but a 360 degree camera mounted on bicycle helmet, and the open source photogrammetry software OpenDroneMap.
Why might you want to do this? With your own up-to-date and highly detailed orthorectified imagery you could:
- quantify and communicate inefficient road space allocation
- record necessary infrastructure repairs
- take measurements such as lane and cycleway widths
- measure footpath obstructions in 3D and rate pedestrian amenity
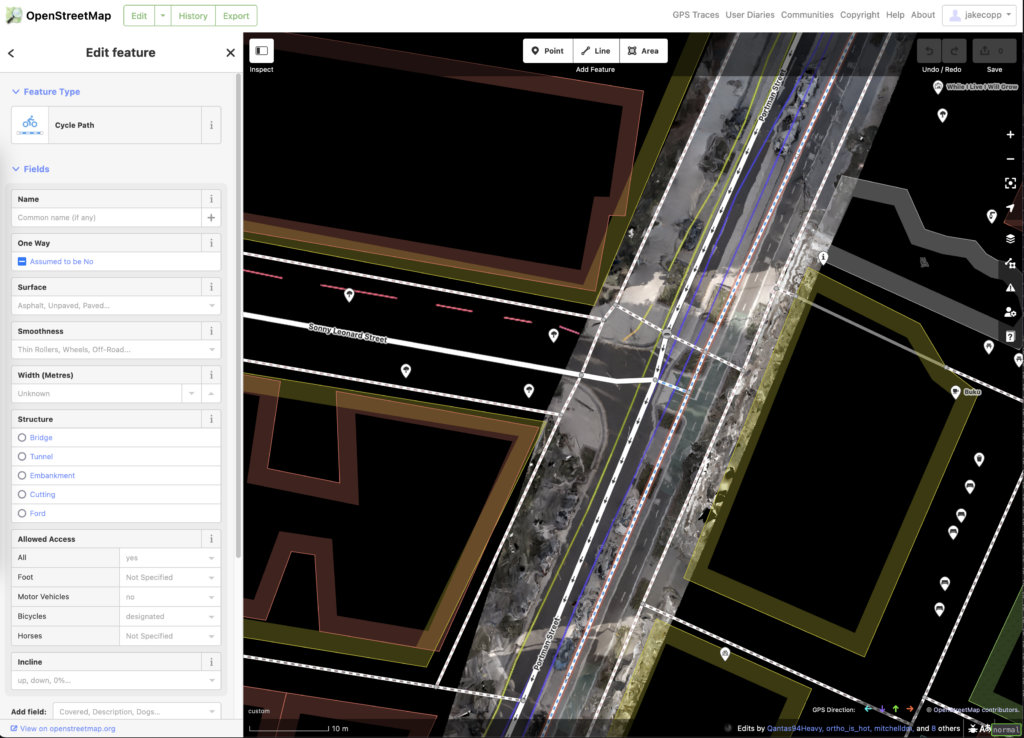
- map kerb features on OpenStreetMap
- survey street parking using the new OSM spec: wiki.openstreetmap.org/wiki/Street_parking
- 3D print a model of your home street!
Drones are great for surveying and mapping things on the kerb (parking/public space/road widths/building shadows) but there are a lot of places you can’t fly a drone.
OpenDroneMap is usually used to combine a set of geotagged drone images into one coherent 3d model, but it can also be used with any geotagged images.
Roughly the process is as follows:
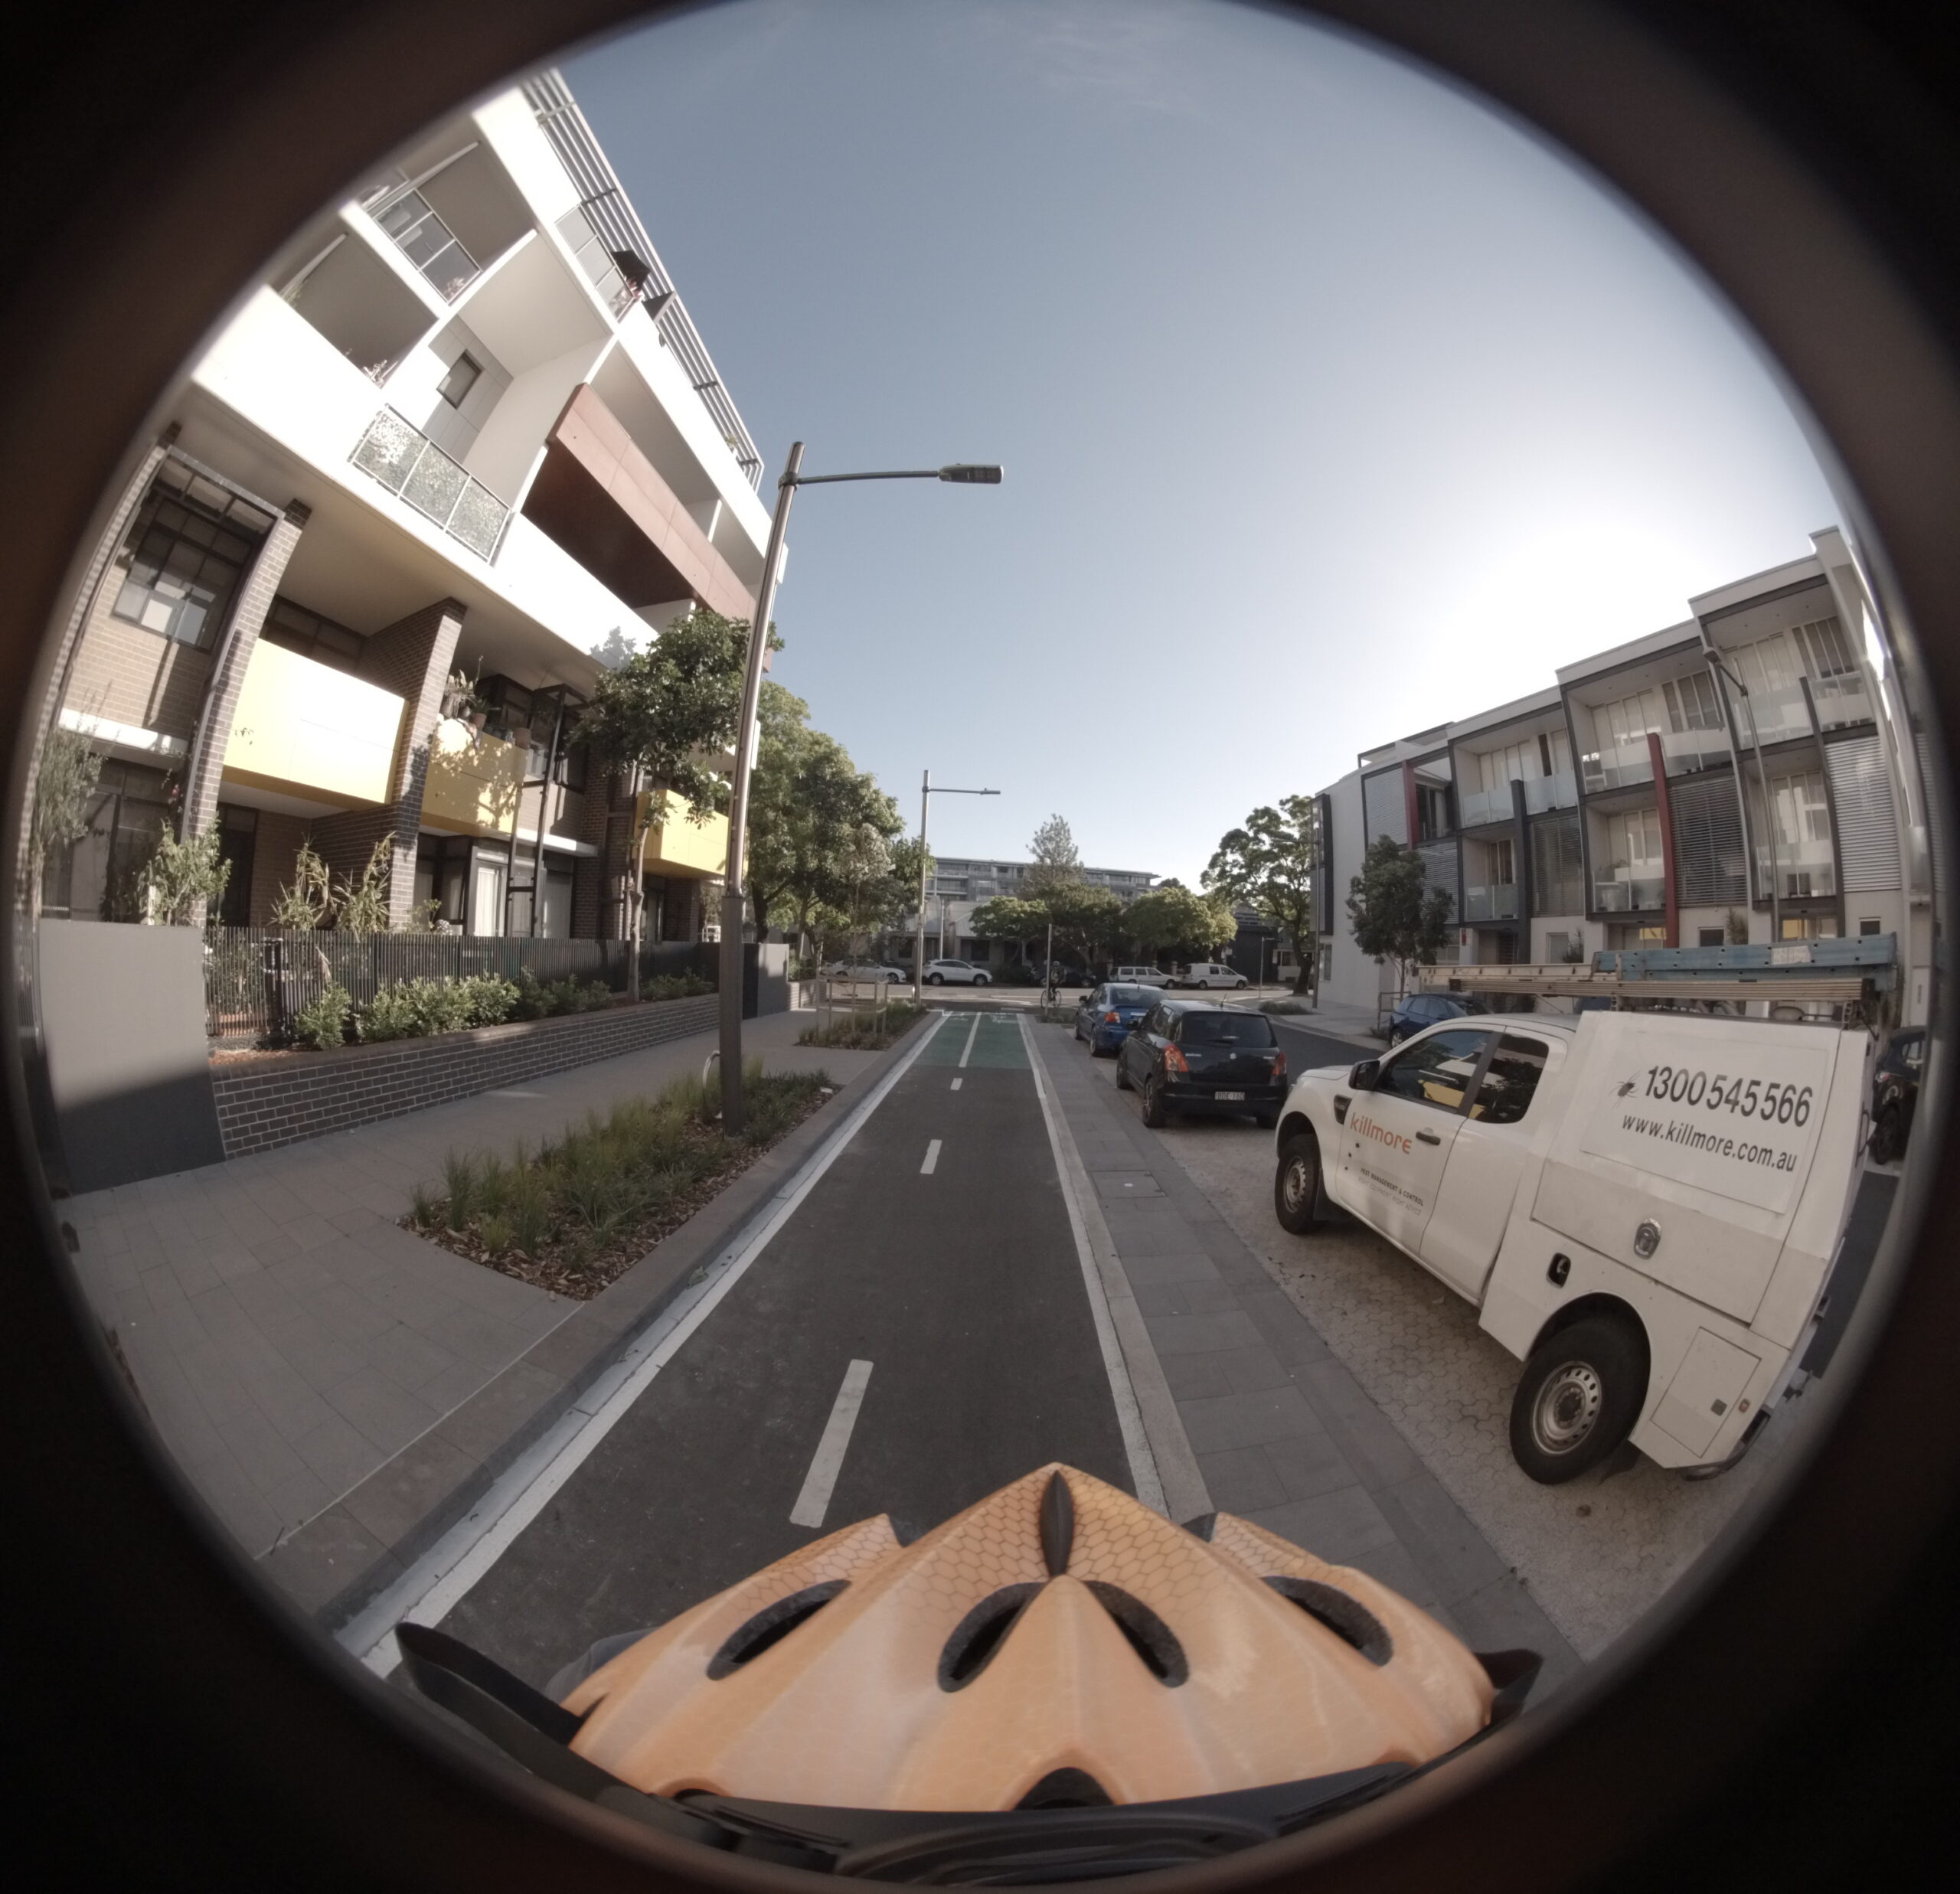
- Take spherical images on a 360 degree camera
- Import the files from the camera
- Optional: Convert the photos into rectangular, spherical images (for GoPro: convert from the proprietary GoPro format to standard spherical images using GoPro Fusion v1.2)
- Start/login to WebODM, upload the images with fisheye lens setting for 180 degree images or spherical for rectangular 360 degree images and generate imagery & model
Please comment any projects you make after reading this guide, or if you have any questions! There are certainly issues with this process with I’ve added under Limitations.
Table of Contents
- Buying a 360 degree camera
- GoPro Fusion specific tips
- Preprocessing the images
- Generating the model and orthorectified imagery with Web OpenDroneMap
- Alternative: Generating and processing equirectangular spherical images
- Limitations
- Appendix: Things that didn’t work
- Further research/experimentation
- Prior art
Buying a 360 degree camera
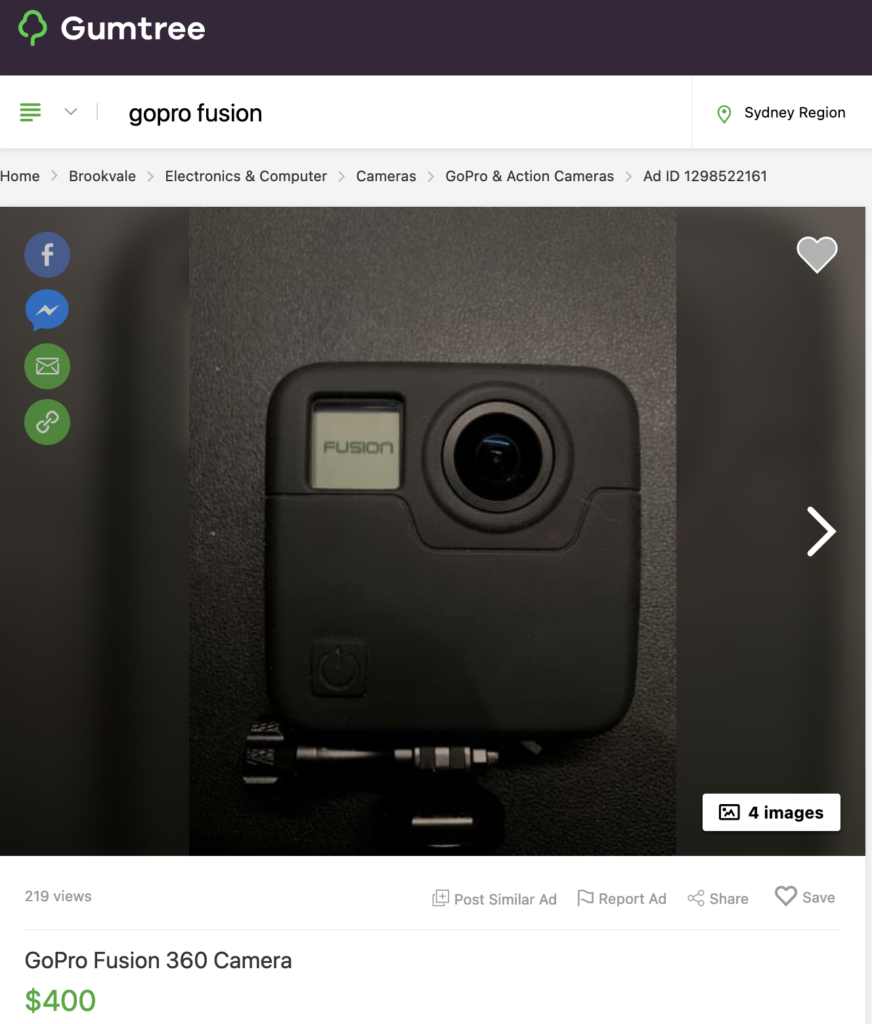
360 degree cameras can be very expensive (the ones mounted on Google Street View cars are possibly $45,000!), but GoPro makes relatively affordable models. See https://help.mapillary.com/hc/en-us/articles/115001465989-About-360-cameras for more suitable cameras. One common second hand (and now unsupported) model is the GoPro Fusion, which I’ll base this guide on.
Note: Seth Deegan has written a PowerShell script for using Insta360 cameras with ODM. I haven’t tried it but it seems worth a look: https://github.com/lectrician1/Insta360-2-ODM
To generate a detailed model you will need to capture enough images close together. You could mount it to the top of your car, but unless you bought an expensive elevated mount much of the image would just be your car roof!
Some advantages of taking imagery from a bicycle:
- The unobstructed field of view is larger so ODM gets more data for a better model
- The average speed is lower permitting more photos (the maximum self timer frequency of this camera is 2 shots/second)
- You can capture images from different places in the street for more data, such as the road, footpath and bike lanes
- If you’re putting in this much effort to study public space and urban planning you probably like bikes 🙂
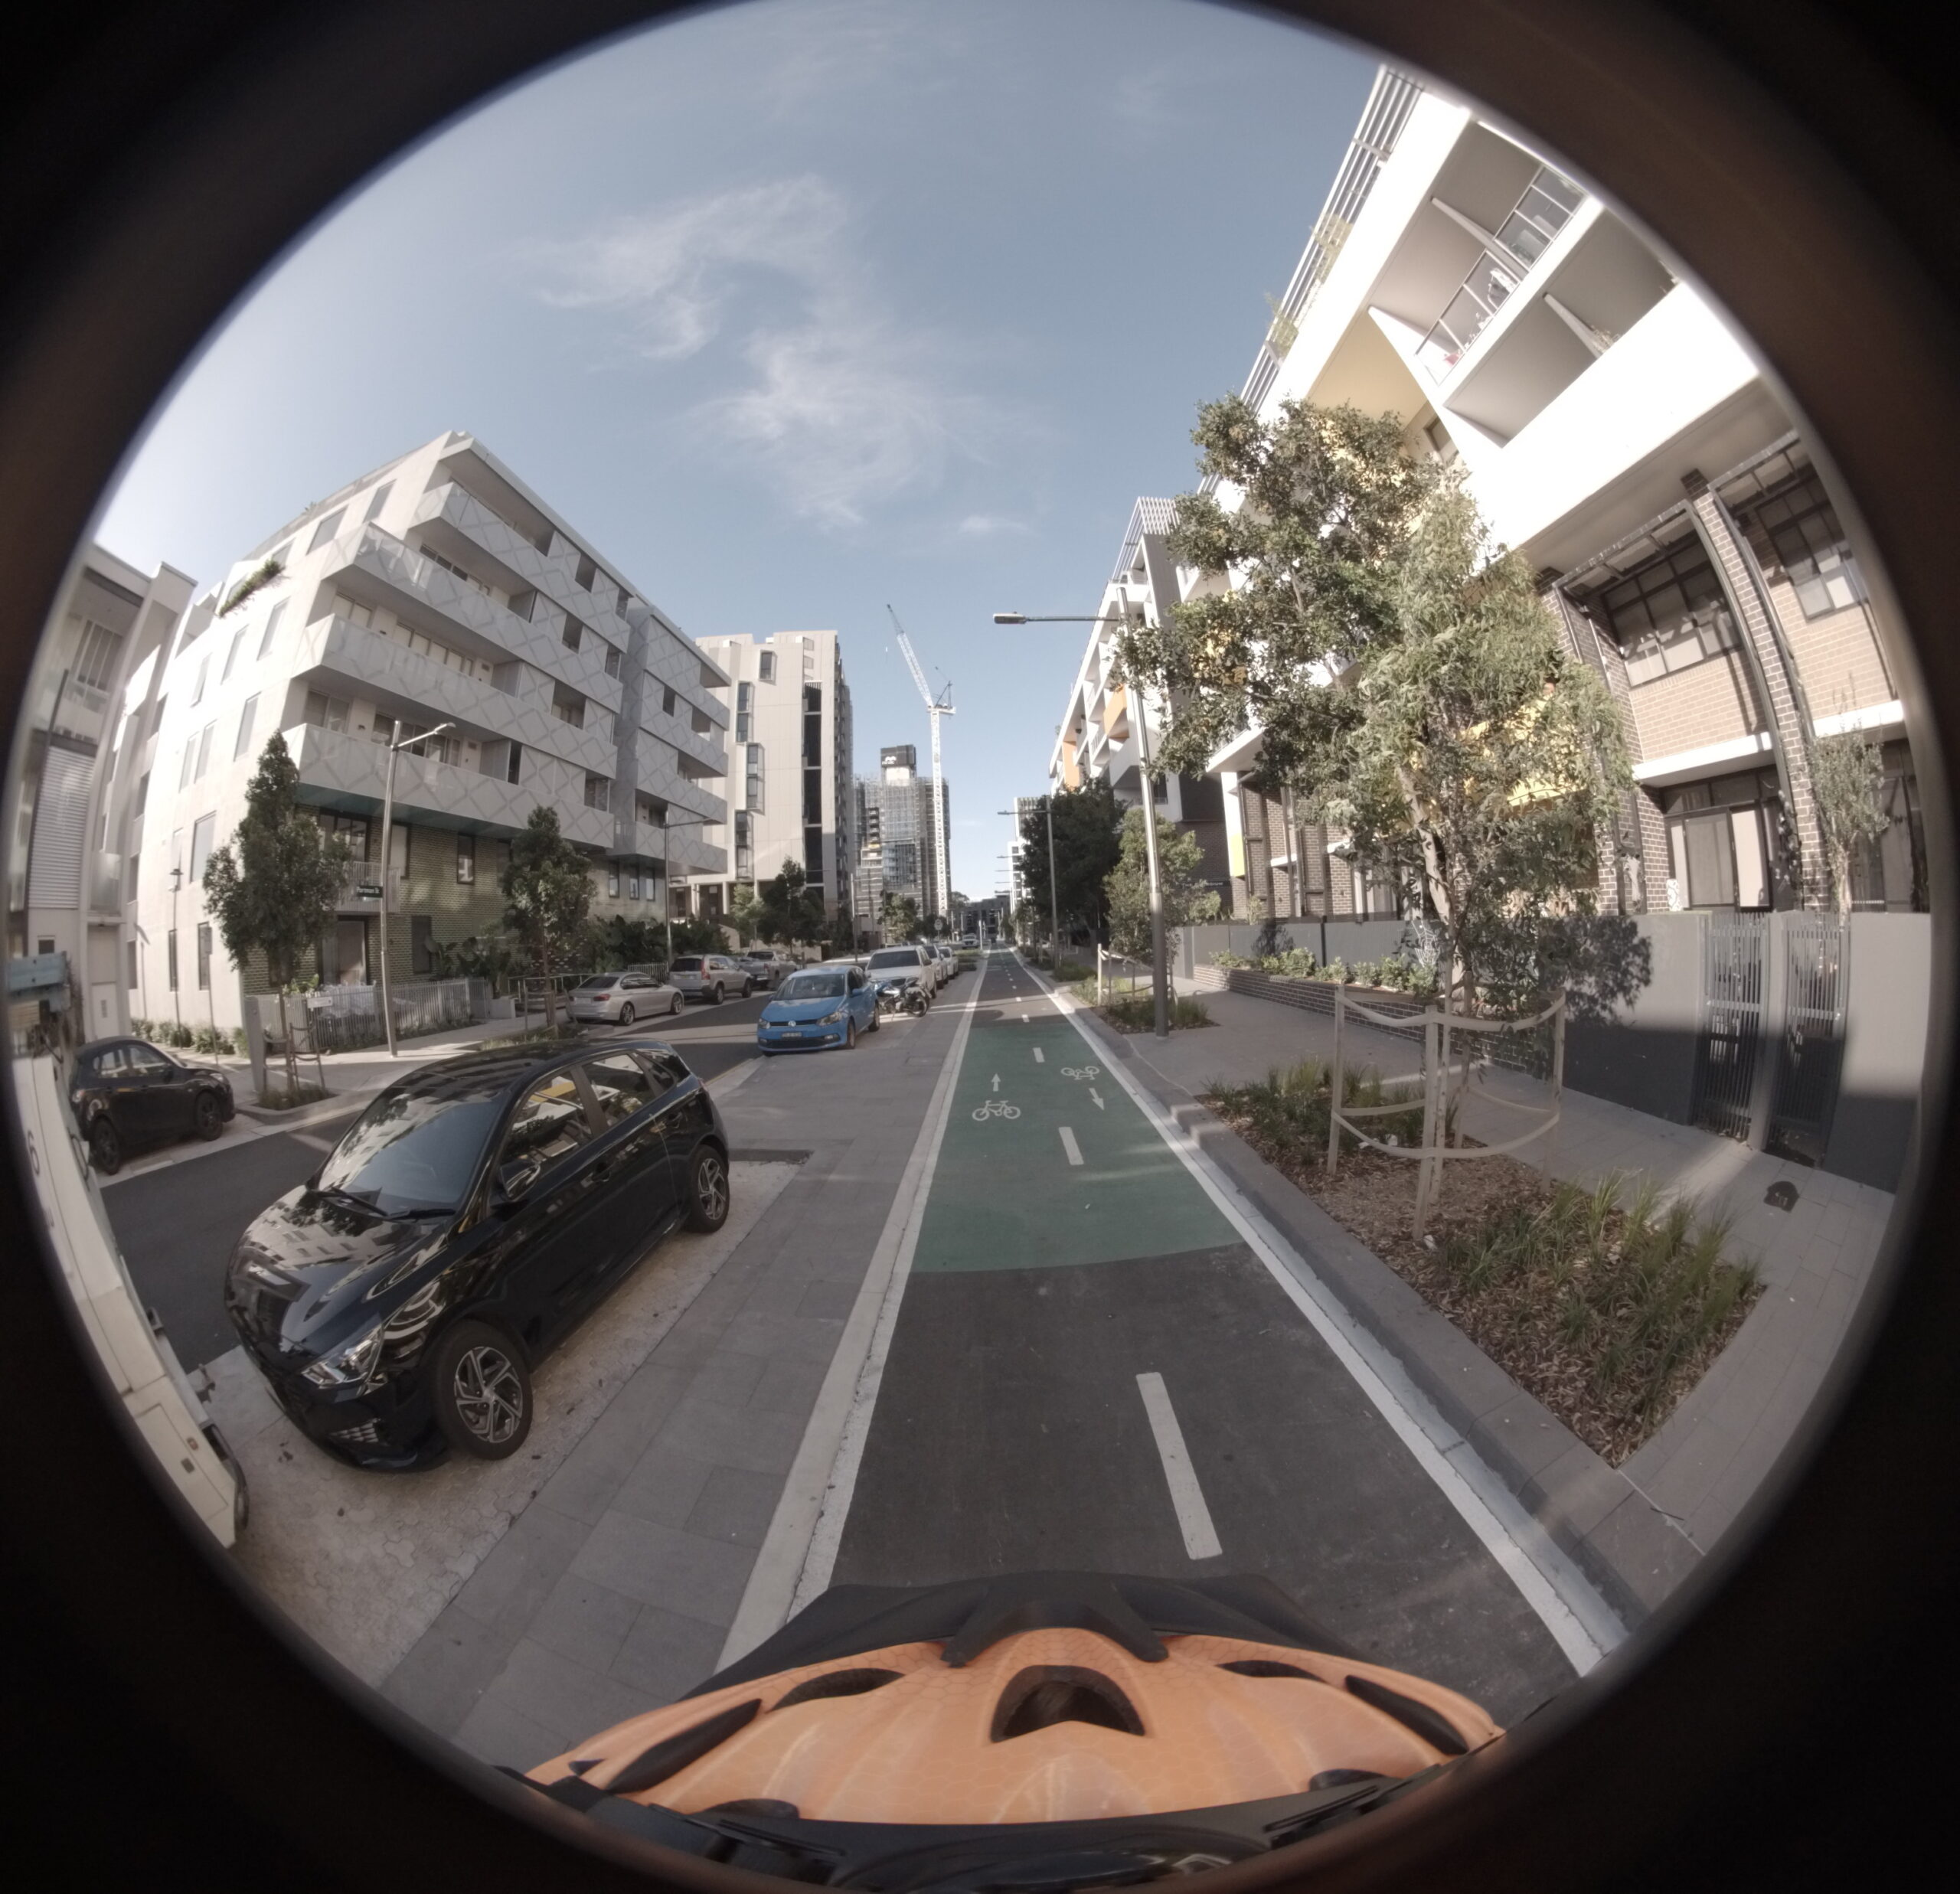
You’ll need to buy a helmet mount for the GoPro or your chosen camera. GoPro makes a bicycle helmet mount: https://gopro.com/en/us/shop/mounts-accessories /vented-helmet-strap-mount/GVHS30.html (though many non-branded mounts exist on eBay/Amazon too). Be aware a camera mounted on a bicycle helmet is possibly a safety risk to yourself if you crash – be careful.
If you have the ability to mount the camera on a long pole above your head, this will increase the unobstructed field of view and improve the perspective of the street which will improve the results. I imagine this would attract even more attention! If you have tips for building rigs like this please leave a comment. Andrew Harvey wrote an OpenStreetMap diary entry on his setup here: https://www.openstreetmap.org/user/aharvey/diary/42139
GoPro Fusion specific tips
Set the camera to:
- Timelapse photo mode (icon of camera & timer circle)
- Image frequency to 0.5 seconds
- Enable GPS geotagging
Mount the camera to the helmet, wait until the GPS location icon turns solid, and start capturing! Sometimes the first few shots don’t have any location in the EXIF data but this doesn’t seem to confuse WebODM, you can check this with identify -verbose image or your metadata viewer of choice.
Preprocessing the images
The GoPro Fusion will output two 180 degree “fisheye” images to two separate SD cards. Copy all these images to a folder onto your computer.
For an alternate method, see instructions under the generating equirectangular image heading.
Unfortunately, only the “front” images have geotagged information, so you’ll need to copy the exif data from each “back” image to each similarly named “front” image.
A quick and dirty way of doing this is generating a list of terminal commands, that copies all exif tags from each “front” to each “back” photo:
ls -l | grep "GF" | sed -E "s/^.* GF(.*).JPG*/exiftool −overwrite_original_in_place -gps:all -tagsFromFile GF\1.JPG GB\1.JPG/g" > script.sh
I’m sure there are better and easier ways of doing this, please let me know if you come up with one.
Generating the model and orthorectified imagery with Web OpenDroneMap
WebODM (https://opendronemap.org) is an absolute marvel of open source engineering. Unfortunately, generating 3D models takes some serious computing horsepower. You can either use the paid cloud version (WebODM Lightening) at https://webodm.net/ (fast) or run the software on your own computer (a few hours/overnight/days depending on the number of images).
You can directly upload images to WebODM Lightening to process, however you don’t get some friendly/useful features like a browsable map and 3d model viewer. I recommend setting up WebODM locally and adding WebODM Lightening as a “processing node”, so you get the power of the cloud and the extra features of WebODM.
Setting up WebODM locally
Running the software using Docker is a breeze. Install Docker from https://www.docker.com/ (or your preferred method), allocate as much memory & CPUs as you can, and then:
git clone https://github.com/OpenDroneMap/WebODM --config core.autocrlf=input --depth 1
cd WebODM
./webodm.sh start
See https://github.com/OpenDroneMap/WebODM#getting-started more more details including GPU acceleration.
You’ll now be able to open WebODM on http://localhost:8000
Optional: Adding WebODM lightening as a processing node
Click lightening network in your WebODM sidebar and login.
Generating the model & selecting the correct options
Add a new project, click “Select images & GCP”, select your images, then you will see options for processing your imagery. If you’re using WebODM Lightening, make sure to set the Processing Node appropriately.
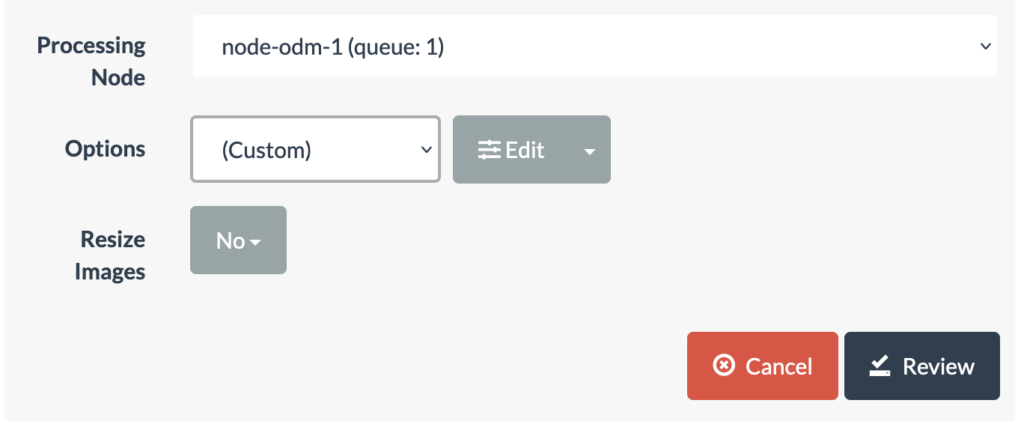
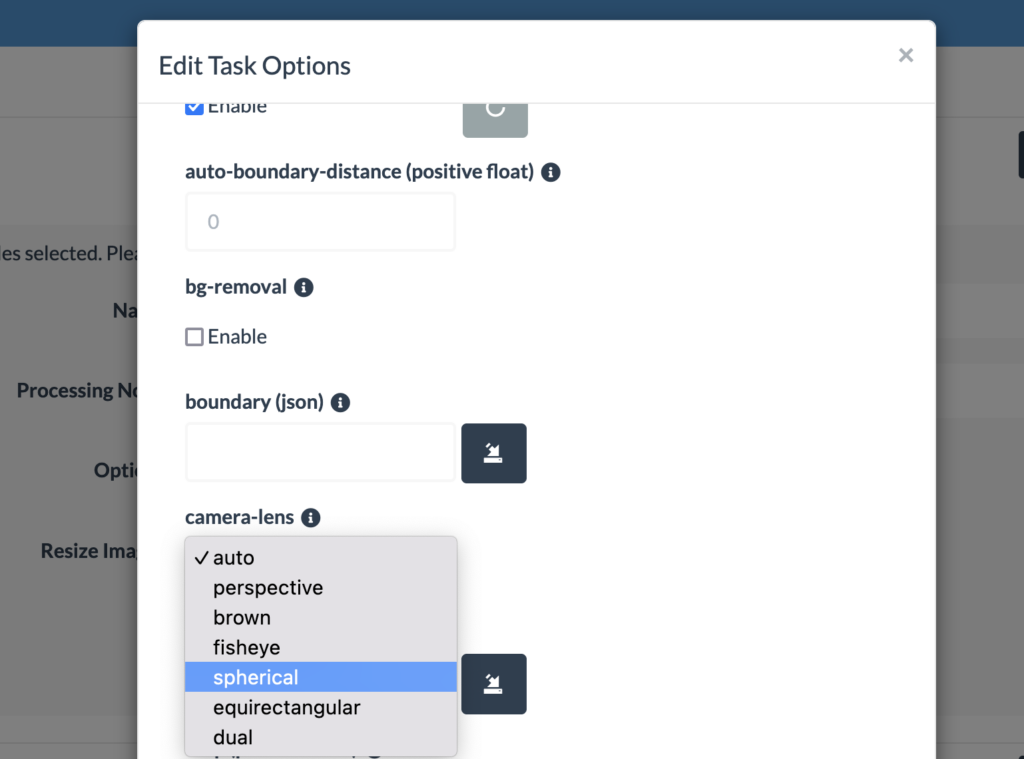
Some options I’ve found are required:
If you are using the raw 180 degree “fisheye” images straight out of the GoPro Fusion, set camera-lens to fisheye (this is critical). If you are using equirectangular images set to spherical. WebODM seems to be unable to auto-identify the lens type in both cases.
- enable
sky removal– this uses AI to mask out the sky in each frame so that there are less artifacts in the final model - enable
auto-boundary - enable
bg-removal
This is just from my trial and error, there may be better option configurations.
You will likely need to enable “resize images” to 2000px or it is very easy to run out of memory.
Though it is out of scope for this article, you can also set up a VPS instance to speed up the process if you don’t want to use the hosted cloud processing tool. Ive tried this, but it’s probably more effort than it’s worth unless you’re making a business out of this.
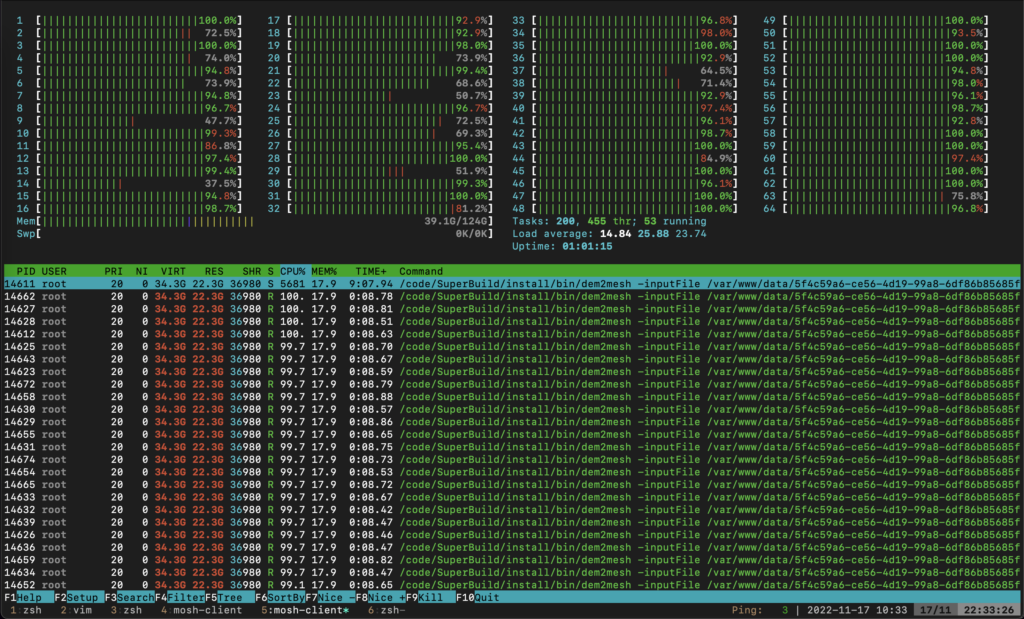
Even with an EC2 instance with 124GB of RAM and 324 images at 5760 × 2180 pixels I ran out of memory – remember to enable some swap space if you want to run at full size: https://www.digitalocean.com/community/tutorials/how-to-add-swap-space-on-ubuntu-18-04
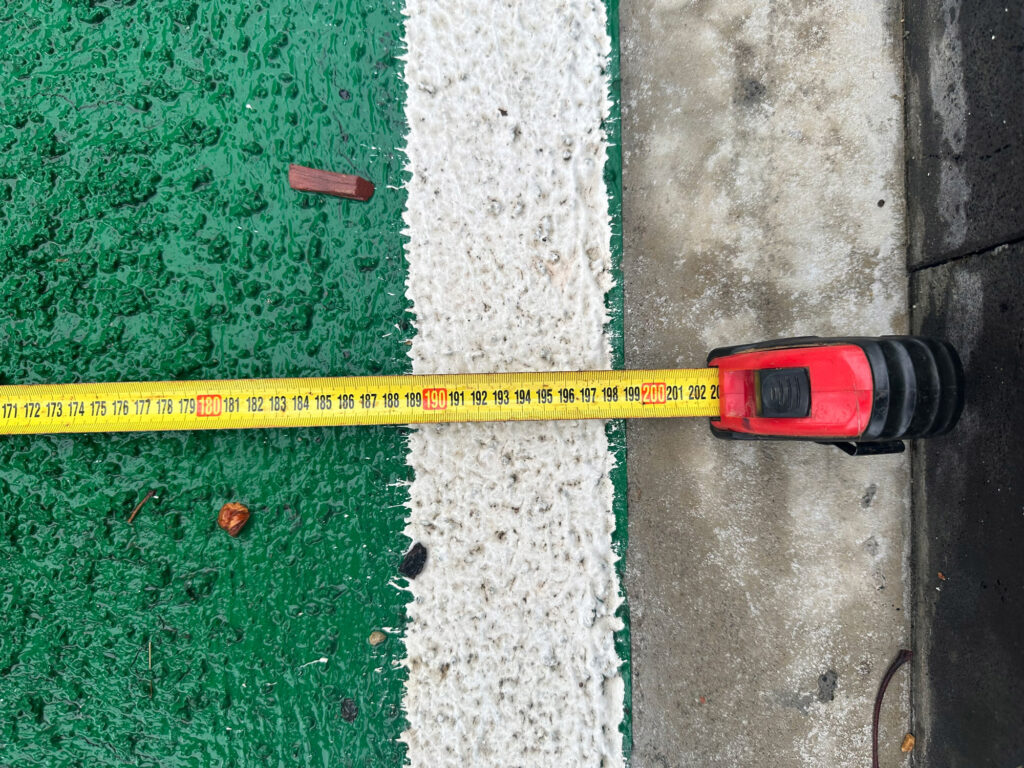
Output accuracy: taking measurements
OpenDroneMap can make measurements of the 3D model. I’ve found these are usually quite accurate; they may have small “measurement” errors due to artifacts or distortion but will tend towards the correct value – GPS coordinates ensure the scale is correct.
For example, measuring the width of the green paint of the cycle path:
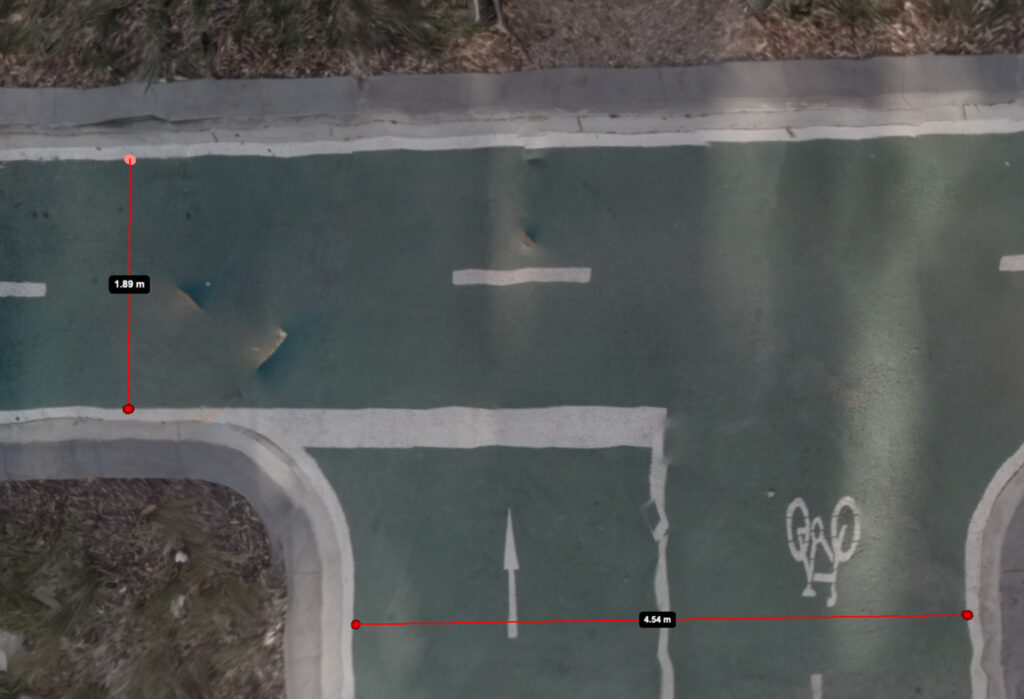
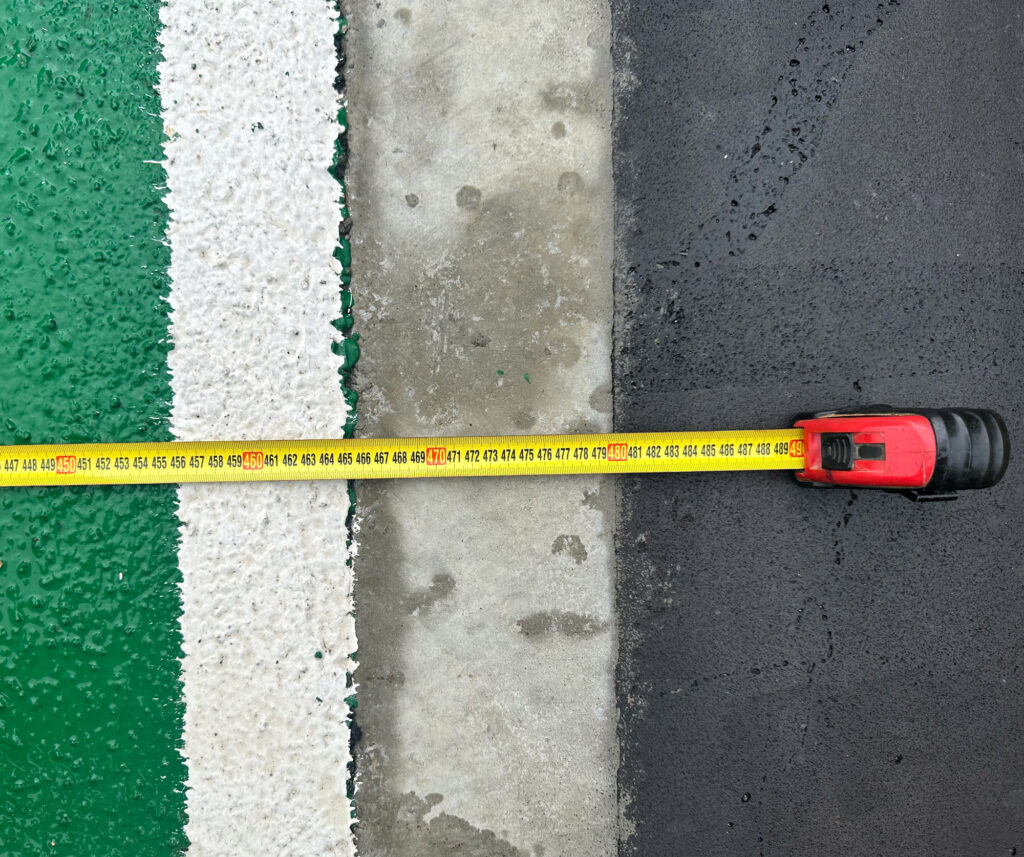
Large path:
- OpenDroneMap: 4.54 metres
- Tape measure: 4.56 metres
Small path:
- OpenDroneMap: 1.89 metres (though this varies slightly due to distortions)
- Tape measure: 1.89 metres
Alternative: Generating and processing equirectangular spherical images
I’m currently unclear whether this method is faster or produces better results than the raw 180 degree images. I’m very interested to hear if you have experience (and I’ll update this if I get more evidence). I believe the GroPro Max generates these images in camera, so this won’t be required.
If you use the GoPro Fusion, unfortunately because this camera is no longer supported GoPro discontinued the software: https://gopro.com/en/au/news/fusion-end-of-life
You’ll (unfortunately) need to use the proprietary GoPro Fusion software to generate spherical images. I’ve found on an M1 Mac (Monterey) the only version that still runs is 1.2, 1.4 just crashes. The least dodgy download I can find is https://macdownload.informer.com/fusion-studio/1.2/.
If you make an open source solution (maybe building from https://stackoverflow.com/questions/37796911/is-there-a-fisheye-or-dual-fisheye-to-equirectangular-filter-for-ffmpeg) please let me know! Edit: Looks like this repo will do it. https://github.com/trek-view/fusion2sphere
This camera has two SD card slots – one for the front facing camera, and one for the back facing camera. Sometimes only one camera works for part of the shoot and the proprietary software refuses to stitch any of the photos at all! The only way I’ve found to combat this is to format the card in camera before each shoot. Spending more on a GoPro Max may solve a lot of headaches!
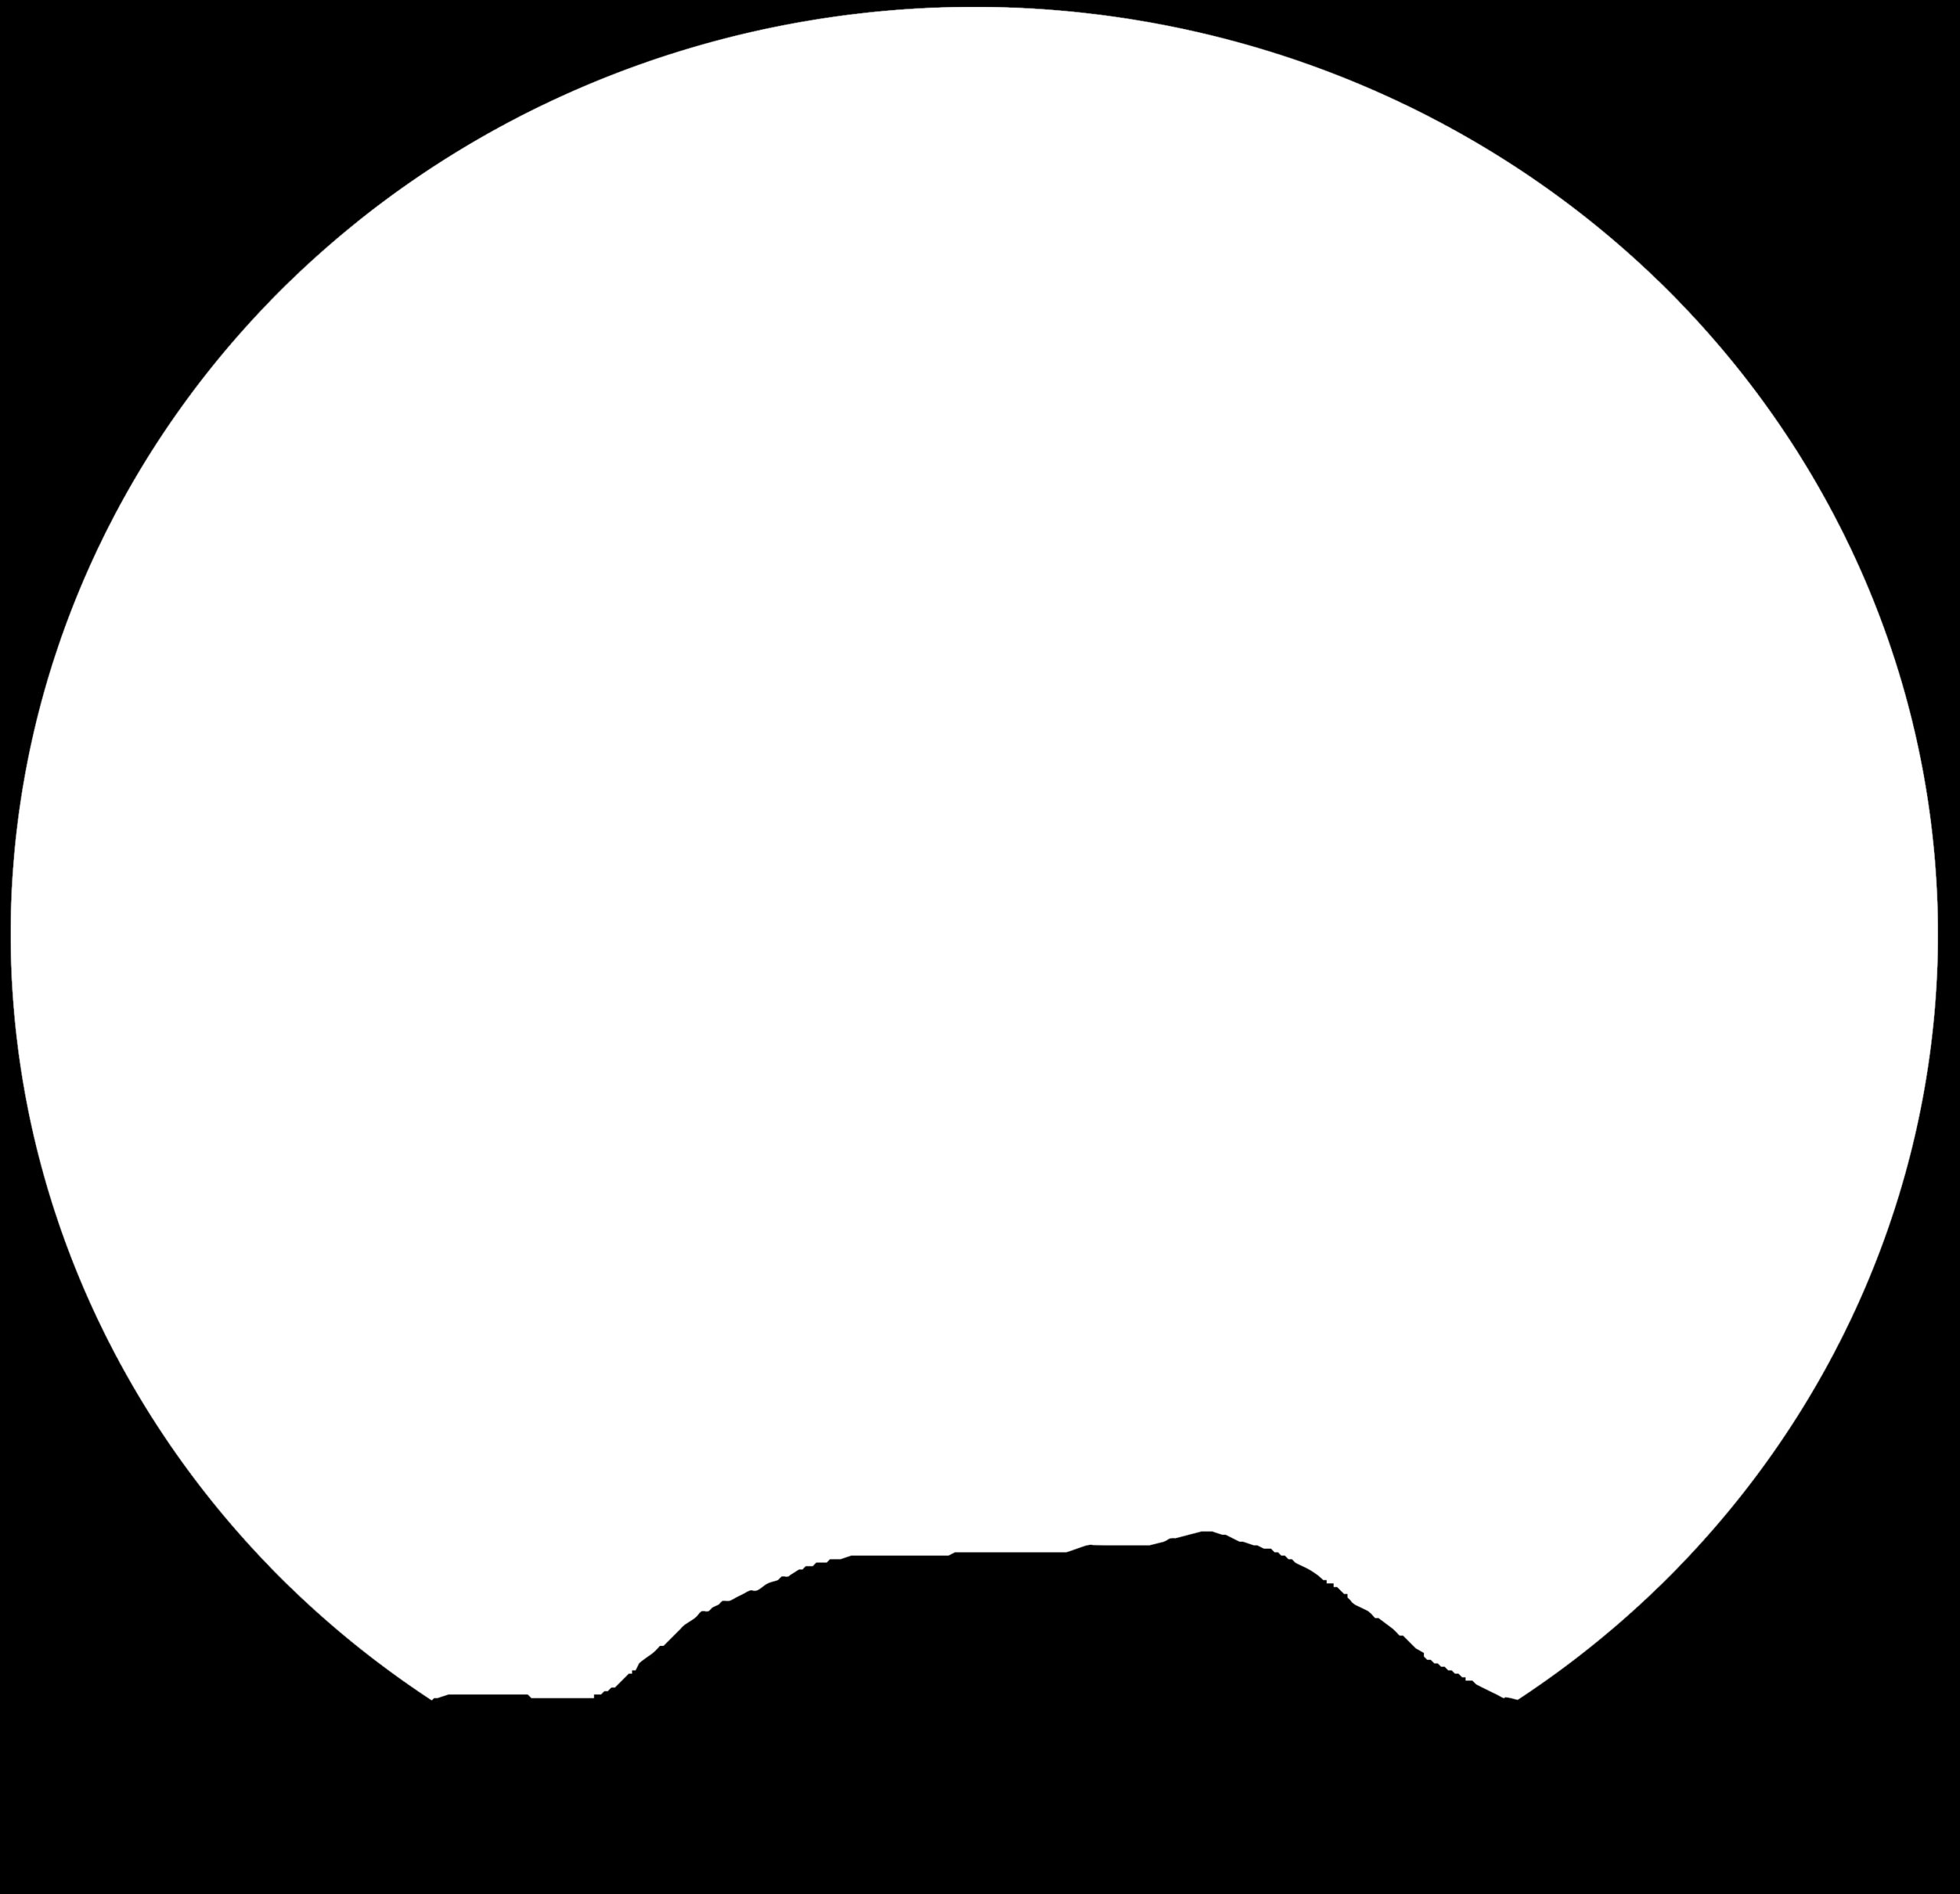
Limitations
Little helmets appear! I’ve tried some techniques but haven’t found a proper solution that doesn’t degrade the model/orthophoto structure.
Appendix: Things that didn’t work
Removing helmet artifacts by cropping
I tried using the convert and mogrify tools (part of the amazing open source ImageMagick suite) can crop the spherical photos and retain the geographical information! The cropping works great, but OpenDroneMap doesn’t seem to be able to understand a cropped equirectangular image. If you’d like to try to get this working, here are the steps I took.
First install ImageMagick (sudo apt-get install imagemagick on Linux/brew install imagemagick on macOS).
The general syntax is:convert -crop {x_size}x{y_size}+{x_offset}+{y_offset} inputfile outputfile
See https://deparkes.co.uk/2015/04/30/batch-crop-images-with-imagemagick/ for more detail and helpful diagrams.
Helpfully, the helmet artifact is always at the bottom of frame, so the x offset and y offset will be zero.
To crop 700 pixels off the bottom of a spherical image, you can use
convert -crop 5760x"$((2880-700))"+0+0 inputfile outputfile
To batch convert a number of files, where the input files are in ./input/, and you have made an output directory ./output/, you can use:
mogrify -monitor -crop 5760x"$((2880-700))"+0+0 -path ./output ./input/*
Removing helmet artifacts by adding a mask
Adding custom drawn masks, either covering just the helmet or also the surrounding black “void” either:
- removed the helments but caused extra “holes”/missing segments in the ground
- didn’t remove the helmets
I think this may be due to clashing behaviour of the bg-removal and sky-removal flags with manual masks.
ODM requires a mask image for every image with _mask.{EXT} as a suffix (where EXT replaces the original extension).
The two mask types I tried:
If you know what may be happening please let me know!
Further research/experimentation
- How many “capture lines” per street are necessary to make a decent model? I didn’t have any luck with one but it may have been my settings. I used ~4 for the above model.
- How much better are models when the camera is on a stick?
- Improved WebODM settings for generation
Prior art
- “A Satellite in Your Pocket: Ground Based Action Cameras to Create Aerial Perspective for OSM Editing”. This was recorded at OpenStreetMap US: Connect 2020 by Sean Gorman. The company Pixel8 doesn’t appear to exist any more.
https://www.youtube.com/watch?v=tfab-iuWlsQ - Twitter thread by @klaskarlsson (@[email protected] on Mastodon) on creating a model of his house using a “GoPro on a stick”: https://twitter.com/klaskarlsson/status/1583401741386936320
- “Create aerial imagery base on 360° pictures” – discussion in the OpenDroneMap community: https://community.opendronemap.org/t/create-aerial-imagery-base-on-360-pictures/12339
Leave a Reply